cd ~{,/zhs/}
Linux 内核编译及添加系统调用
杭电操作系统实验一,个人笔记。
- 发布于 2018 年 07 月 22 日
- 更新于 2020 年 12 月 12 日
- Markdown
写在最前
写给 Linux 命令行新人的一点人生经验:
- 路径开头的「/」是根目录,「~」是用户家目录;注意分隔符也是斜杠「/」不是转义用的反斜杠;
- 命令提示符为「#」指该命令以 root 权限执行;「$」则意味着以其他用户身份执行命令;
- 想要知道命令的作用:看全名/描述,比如
whatis ls会告诉你 ls 是 list directory contents; - 想要知道命令的用法/选项的含义:看文档(如
man cd)或者帮助(如cd --help),本文中所有选项都已展开成全称。
系统环境
建议使用带有快照功能的虚拟化平台,发行版采用 Arch Linux 是因为有官方文档可以参考。
创建虚拟机时其他选项建议跟随默认,主要建议以下几点:
- 处理器直接拉满,尽量发挥物理机处理器全部性能;
- 内存不低于 4G,实在不够的话建议后续分区时加一个 2G 的交换分区或者使用交换文件;
- 磁盘不小于 50G,编译过程中会生成额外的文件,尽量确保预留足够的磁盘空间,以免后续调整麻烦。
安装 Arch Linux 请认真参阅官方文档的安装教程,以下只列出几点虚拟机中需要注意的:
- 分区表:虚拟机通常默认为 BIOS 启动方式,建议磁盘分区采用 MBR 分区表,如
cfdisk工具中选择dos类型的分区表类型; - 分区方案:全盘只分一个区来挂载根目录即可,注意该分区要设为 bootable(也可能是 boot flag 字样);
镜像源
最近 archiso 新加入了基于 Reflector 自动排序镜像的功能,不过我觉得还是手动设置一下比较稳妥。
国内镜像源里面清华、中科大知名度都太高了,负载高反倒体验差;建议使用北外源,也是清华提供的技术支持。
# cd /etc/pacman.d/
# mv --verbose mirrorlist{,.backup}
# host='https://mirrors.bfsu.edu.cn'
# echo "Server = $host/archlinux/\$repo/os/\$arch" > mirrorlist
# cat mirrorlist
检查 mirrorlist 文件内容已被修改成 Server = https://mirrors.bfsu.edu.cn/archlinux/$repo/os/$arch 即可。
软件包
基础
# pacstrap /mnt base linux-lts grub dhcpcd
base是 Arch Linux 必需的最基础包组;linux-lts是 Arch Linux 官方的长期支持版 Linux 内核,落笔时的版本是 5.4.73;grub是启动加载器,安装完成后一定不要忘记生成配置文件,别问我怎么记住的;dhcpcd是 DHCP 客户端,重启进入安装好的系统后执行systemctl enable --now dhcpcd即可永久开启虚拟机内的网络功能;
工具
# pacman --sync wget progress nano
这三个软件包分别是后续步骤中下载、查看解压进度、编辑源码用到的工具。
构建
# pacman --sync base-devel xmlto kmod inetutils bc libelf git
具体构建依赖应以 ArchWiki 为准:Kernels/Traditional compilation - ArchWiki
创建非特权用户
准备工作不需要也不建议使用 root 权限操作,创建并切换至非特权用户,此处的 liolok 是我的 ID。
# useradd --create-home liolok
# passwd liolok
# su --login liolok
创建构建目录
创建一个目录,存放内核源码,并进行编译及构建。
笔者使用的内核构建目录是 ~/kernel-build,其中「~」表示上一步骤创建的用户主目录 /home/liolok。
$ mkdir ~/kernel-build && cd ~/kernel-build # make and change to build directory
为什么不用 /usr/src/linux:
/usr/src 这个目录确实应用来存放各种源码,但应仅用作参考(reference),而不应进行构建。
(参见 Linux 文件系统层次结构标准)
内核编译
下载解压
Linux 内核官网:The Linux Kernel Archives
届时最新的 LTS 版本号是 5.4.74(2020.11.01),为了下载得更快推荐使用国内的镜像源(同上文,采用北外源):
$ version='5.4.74'
$ host='https://mirrors.bfsu.edu.cn'
内核源码压缩包的文件格式是 .tar.xz(也有 .tar.gz),tar 是打包/归档工具,xz/gz 是压缩工具,至于 .tar.sign 文件是用于验证的签名。
使用 wget 进行下载和解压的方法:
$ pwd # you should be working under `~/kernael-build`
$ wget $host/kernel/v5.x/linux-$version.tar.{xz,sign}
$ unxz linux-$version.tar.xz & progress --monitor --pid $!
完成后构建目录下应该有解压之后的 .tar 文件和 .tar.sign 签名。
验证签名
本步骤参考 Linux 内核官方文档:Using GnuPG to verify kernel signatures。
下载并导入两位内核主要作者的公匙,验证源码的完整性。如果下载到的文件本身就是损坏的,那编译成功也有可能工作不正常。
$ gpg --locate-keys [email protected] [email protected] # download and import keys
$ gpg --verify linux-$version.tar.sign # verify the .tar archive against the signature
不用管有没有 warning,输出中有「Good signature」字样即可,否则说明源码归档包已损坏。
此时建议为虚拟机创建一个快照,后面即将开始折腾。
解包源码
现在只需将其解包到同名子目录即可得到内核的源代码:
$ tar --extract --file=linux-$version.tar & progress --monitor --pid $!
$ cd linux-$version
这个步骤我们得到了内核源码的未修改版,也可以做个快照。
清理编译历史
每次编译前,都要确保目录下的编译历史已被清理干净,同样也不要指望刚解包得到的源码目录就一定是干净的。
$ make mrproper # ensure the kernel tree is absolutely clean
导入默认配置
这里修改 local version 是为内核版本号追加一个后缀,虽然不是必需的,但也方便后续验证编译成果。
$ zcat /proc/config.gz > .config # use Arch Linux default configuration
$ make nconfig # append your custom local version string
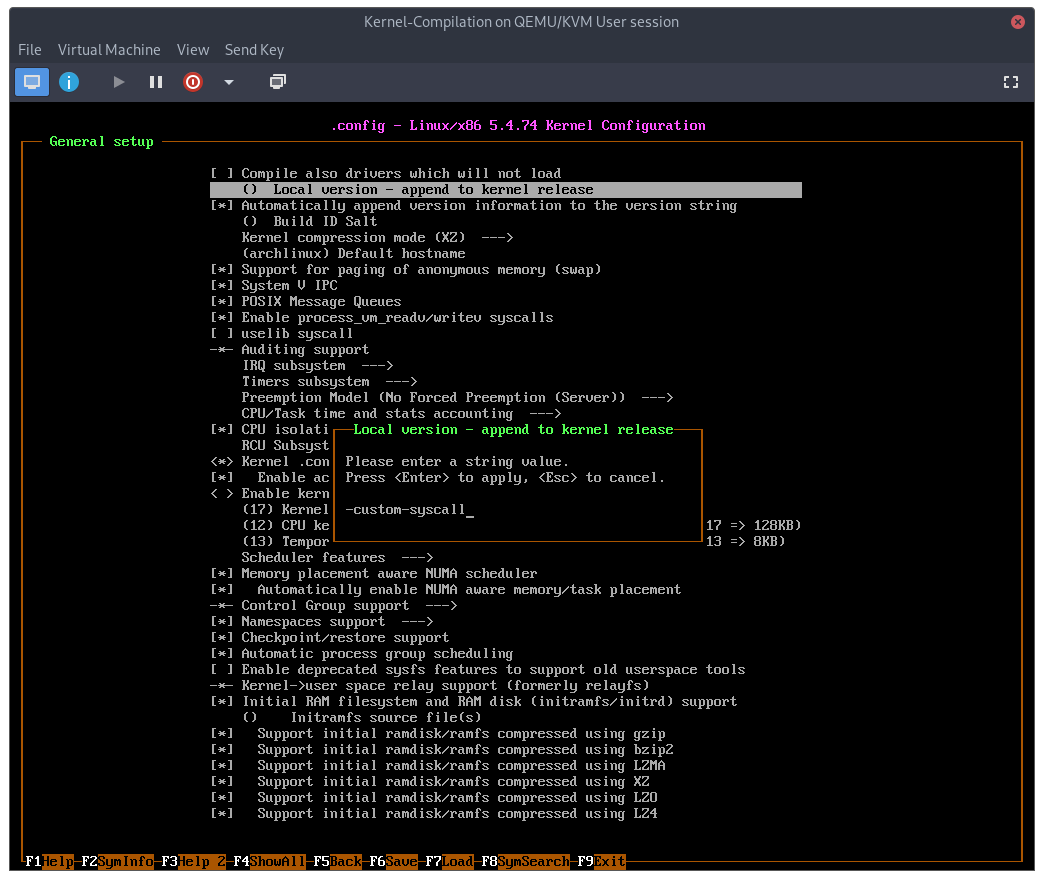
输入自定义的版本后缀后,按 F6 保存配置、F9 退出。
编译内核
使用 time 命令可为编译计时;使用 --jobs=X 选项可并行工作以加快编译,其中 X 为处理器线程数,对应虚拟机的配置。
$ time make --jobs=8 # compile kernel
编译内核模块
注意!接下来的步骤均需要以 root 身份进行操作,使用 su 切换至 root 用户继续后续操作。
# make modules_install # compile kernel modules
安装内核
可执行文件
# cp --verbose ./arch/x86_64/boot/bzImage /boot/vmlinuz-linux-custom # 64-bit kernel
此处的 bzImage 和 vmlinuz-linux-custom 是编译内核及模块得到的压缩可执行文件;命名是约定俗成的,可以自行修改后缀如 vmlinuz-linux-blabla,后续步骤中还会用到。
初始化内存盘
拷贝一份已有的 mkinitcpio preset 并加以修改,便可用于生成对应内核的 initramfs 镜像。
# cp --verbose /etc/mkinitcpio.d/linux-lts.preset /etc/mkinitcpio.d/linux-custom.preset # copy a preset
此处如果提示找不到 linux-lts.preset,可使用 ls /etc/mkinitcpio.d 查看实际文件名称。
# nano /etc/mkinitcpio.d/linux-custom.preset # modify copied preset
进行如下修改:
...
ALL_kver="/boot/vmlinuz-linux-custom"
...
default_image="/boot/initramfs-linux-custom.img"
...
fallback_image="/boot/initramfs-linux-custom-fallback.img"
最后,为内核生成 initramfs 镜像。
# mkinitcpio --preset linux-custom # generate initramfs images
符号表
# cp --verbose ./System.map /boot/System.map-linux-custom
# ln --verbose --symbolic --force /boot/System.map-linux-custom /boot/System.map # create a symlink
更新引导配置
至此,使用 ls /boot 检查,应已新增以下文件:
- 可执行文件: vmlinuz-linux-custom
- 初始化内存盘: initramfs-linux-custom.img 和 initramfs-linux-custom-fallback.img
- 符号表: System.map-linux-custom 以及 System.map
让 GRUB 自动识别新安装到 /boot 的内核并将其添加至引导菜单:
# grub-mkconfig --output=/boot/grub/grub.cfg # update grub configuration
重启至新内核
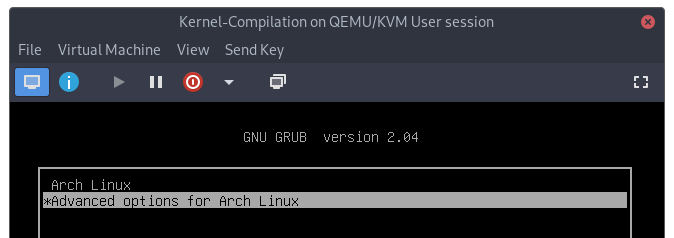
重启后在 GRUB 引导菜单的高级选项中选择新编译安装好的内核:

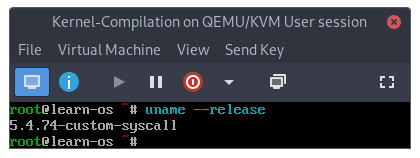
进入系统后使用 uname --release 命令可以看到之前自定义的版本号后缀,说明已切换至新内核:
添加系统调用
Adding a New System Call — The Linux Kernel documentation
在刚刚编译的官方内核的基础上,添加一个自定义的系统调用 setnice,功能如下:
- 按需修改指定进程的 nice 数值;
- 读取该进程的 nice 与优先级(priority)的数值。
为了添加系统调用,要对此前的官方内核源码进行微量的修改:
$ cd ~/kernel-build/linux-$version # kernel source code directory
绝大多数情况下,内核会透明地处理指针,从而向旧兼容 32 位的用户空间程序。 对于我们要添加的简单系统调用而言,不需要另外单独实现 32 位兼容版本。
函数原型
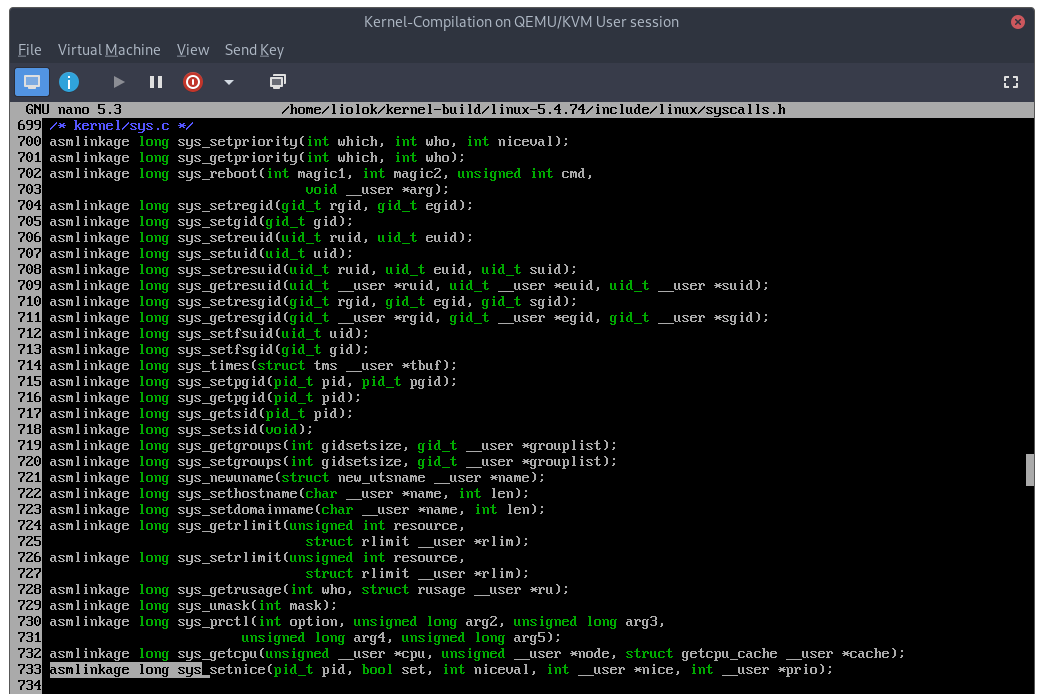
系统调用的函数原型位于内核源码目录下的 ./include/linux/syscalls.h:
系统调用表
通用系统调用表
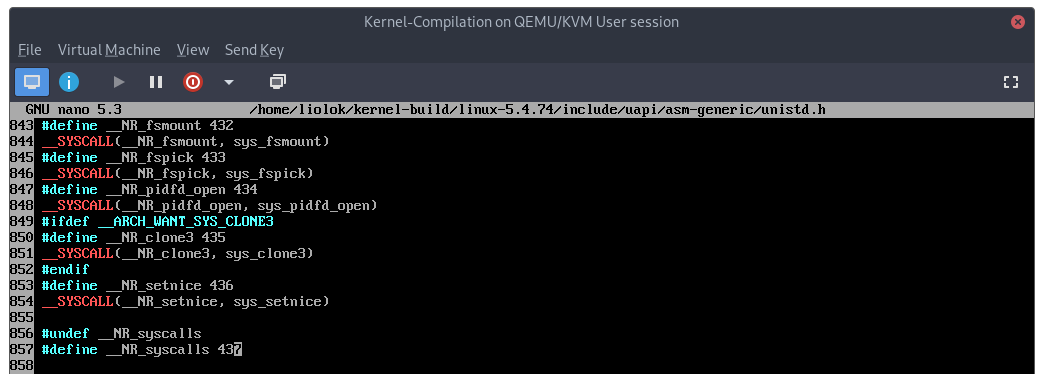
通用系统调用表位于 ./include/uapi/asm-generic/unistd.h,
按对应格式在列表末尾追加表项(注意也要相应的增加 __NR_syscalls 的值):
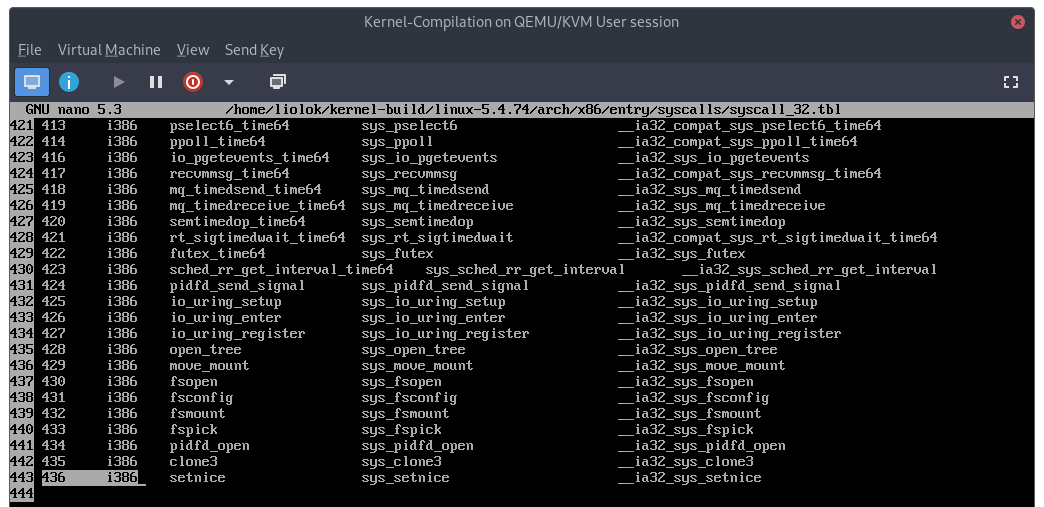
x86 系统调用表
Adding a New System Call — The Linux Kernel documentation
x86 架构的系统调用表位于 ./arch/x86/entry/syscalls/syscall_{64,32}.tbl 两个文件中,按对应格式在列表末尾追加表项:
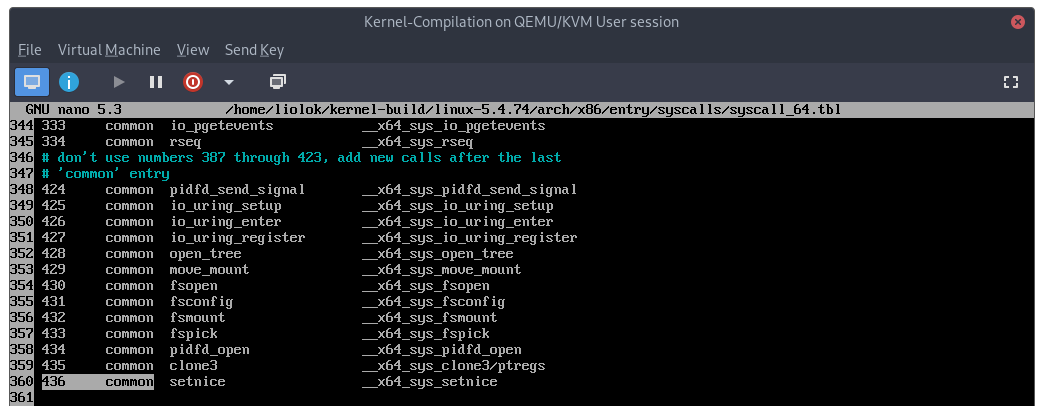
(common 代表 64 位版本的系统调用向旧兼容 32 位用户空间程序;如前文所说,我们自定义的简单系统调用可以通过内核的透明处理自动兼容。)
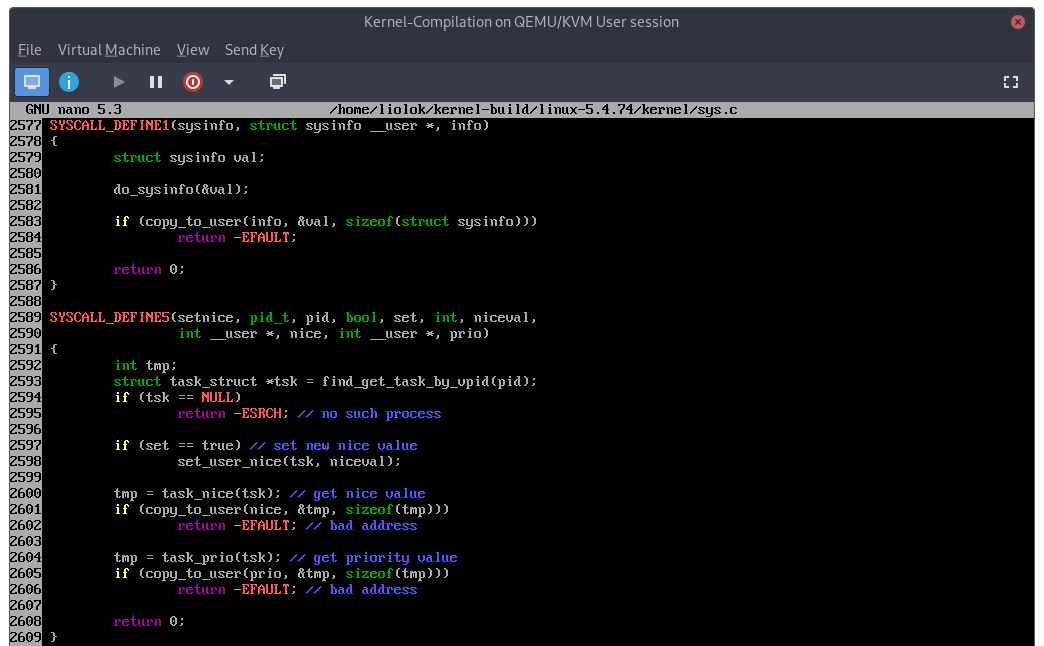
入口点
系统调用的入口点通常位于 ./kernel/sys.c 文件中:
/*
 * Set/get nice value and get priority value of a process with given ID;
 * Set new nice value only if parameter set is true;
 * Get values of nice and priority of the process at last.
 */
SYSCALL_DEFINE5(setnice, pid_t, pid, bool, set, int, niceval,
                int __user *, nice, int __user *, prio)
{
    int tmp;
    struct task_struct *tsk = find_get_task_by_vpid(pid);
    if (tsk == NULL)
        return -ESRCH; // no such process

    if (set == true) // set new nice value
        set_user_nice(tsk, niceval);

    tmp = task_nice(tsk); // get nice value
    if (copy_to_user(nice, &tmp, sizeof(tmp)))
        return -EFAULT; // bad address

    tmp = task_prio(tsk); // get priority value
    if (copy_to_user(prio, &tmp, sizeof(tmp)))
        return -EFAULT; // bad address

    return 0;
}
宏定义 SYSCALL_DEFINE5():
- 数字取值范围为 [0, 6],代表系统调用的参数个数;
- 括号内第一个参数为系统调用名称,其后是成对出现的参数类型和参数名称。
如上图中的 SYSCALL_DEFINE1(sysinfo, struct sysinfo __user *, info) 声明了名为 sysinfo 的系统调用,
其第一个也是唯一的参数是类型为 struct sysinfo __user * 的 info。
而我们添加的系统调用 setnice 有五个参数:
pid_t(int的一个别名)类型的pid(number):进程 ID 数字;bool类型的set:为真则修改进程的 nice 数值int类型的niceval:用于修改进程 nice 数值;int __user *类型的nice:用于读取进程的 nice 数值;int __user *类型的prio:用于读取进程的优先级数值。
宏定义 __user 是用于内核静态分析的用户空间地址的注解,表示该指针不可直接解引用(dereference)。可以看到后面我们会用到 copy_to_user() 函数来安全地操作。(参见 StackOverflow 上的这个回答)
函数 find_get_task_by_vpid():在当前 PID 命名空间中查找 PID 并得到其对应的 PCB。整个过程是一个临界区,使用了 RCU (Read-Copy-Update) 机制 来实现对 PID 命名空间中 PID 基数树的保护。
函数 set_user_nice() 粗略分析:
void set_user_nice(struct task_struct *p, long nice)
{
	bool queued, running; // 进程是否在运行队列中、进程是否正在运行
	int old_prio, delta; // 原优先级、变化量
	struct rq_flags rf;
	struct rq *rq;

    // 新的 nice 值与原值相同或者超出范围则直接返回
	if (task_nice(p) == nice || nice < MIN_NICE || nice > MAX_NICE)
		return;
	/*
	 * We have to be careful, if called from sys_setpriority(),
	 * the task might be in the middle of scheduling on another CPU.
	 */
	rq = task_rq_lock(p, &rf); // 获取进程所在的运行队列,并使用自旋锁保护运行队列以及进程的优先级继承数据结构
	update_rq_clock(rq); // 更新运行队列时钟?

	/*
	 * The RT priorities are set via sched_setscheduler(), but we still
	 * allow the 'normal' nice value to be set - but as expected
	 * it wont have any effect on scheduling until the task is
	 * SCHED_DEADLINE, SCHED_FIFO or SCHED_RR:
	 */
	if (task_has_dl_policy(p) || task_has_rt_policy(p)) {
		p->static_prio = NICE_TO_PRIO(nice);
		goto out_unlock;
	}
	queued = task_on_rq_queued(p); // (p->on_rq == TASK_ON_RQ_QUEUED)
	running = task_current(rq, p); // (rq->curr == p)
	if (queued)
		dequeue_task(rq, p, DEQUEUE_SAVE | DEQUEUE_NOCLOCK); // 「伪」出列,尽量保留状态,不更新时钟
	if (running)
		put_prev_task(rq, p); // 暂停运行

	p->static_prio = NICE_TO_PRIO(nice); // ((nice) + DEFAULT_PRIO) == (120 + nice)
	set_load_weight(p, true);
	old_prio = p->prio;
	p->prio = effective_prio(p); // 对于常规进程,本质上是将前面算好的 static prio 赋值给 prio
	delta = p->prio - old_prio; // 计算优先级变化量

	if (queued) {
		enqueue_task(rq, p, ENQUEUE_RESTORE | ENQUEUE_NOCLOCK); // 修改完毕,「伪」入列
		/*
		 * If the task increased its priority or is running and
		 * lowered its priority, then reschedule its CPU:
		 */
		if (delta < 0 || (delta > 0 && task_running(rq, p))) // ?task_running() v.s. task_current()
			resched_curr(rq); // 重新调度当前运行队列
	}
	if (running)
		set_next_task(rq, p); // 继续运行
out_unlock:
	task_rq_unlock(rq, p, &rf);
}
分析优先级的头文件以及函数 task_nice() 和 task_prio() 可以总结出,对于常规进程而言:
- nice 取值范围为 [-20, 19];
static_prio、normal_prio、prio三者是相同的;- 优先级取值范围是 [100, 139],由默认值 120 和用户的 nice 值来调整;
- 呈现给用户的优先级数值还要再减去实时进程优先级最大值
MAX_RT_PRIO即 100,最终范围是 [0, 39]。
重新编译内核
添加了系统调用的少量代码后,重新编译内核从而运行该系统调用;具体步骤应从清理编译历史开始。
测试系统调用
编写一个用户态程序以测试新添加的系统调用,如笔者的 test_setnice.c 代码如下:
#include <sys/syscall.h> // syscall()
#include <unistd.h> // pid_t, getpid()
#include <stdio.h> // scanf(), printf()

#define __NR_setnice 436 // syscall name and number

int main(void)
{
    printf("[ Test program for syscall setnice ]\n");
    printf("-------------------------------------------\n");
    printf("Will test on this process itself by default\n");
    printf("or anohter process (need input process id).\n");
    printf("-------------------------------------------\n");
    printf(":: Test on this process itself? [y/n] ");

    pid_t pid; // pid number
    char choice;
    scanf("%c%*c", &choice); // choose process to test
    if (choice != 'y') {
        printf(":: Process ID: ");
        scanf("%d", &pid);
    }
    else {
        pid = getpid();
        printf("Process ID: %d\n", pid);
    }
    choice = 'g'; // get nice value at first time
    printf("Original values:\n");
    int count = 1;
    do {
        int err, niceval, nice, prio;
        int set = (choice != 'g');
        if (set) {
            printf(":: New nice [-20, 19]: ");
            scanf("%d%*c", &niceval);
        }
        if (err = syscall(__NR_setnice, pid, set, niceval, &nice, &prio)) {
            printf("Error %d, test terminated.\n", err);
            return err;
        }

        printf("Nice:     %d\n", nice);
        printf("Priority: %d\n", prio);
        printf(":: [%d] Set/get nice value? (Ctrl+C to exit) [s/g] ", count++);
    } while (scanf("%c%*c", &choice) != EOF);
}
在终端下编译运行并进行测试,结果如下:
